
Much has happened since we finished the upgrades to the bucket while the Green Crack from Crop King Seeds was still in veg. I decided to go on a long needed vacation and left town for a month. With a bit a trepidation I left the plant and bucket in the care of a good friend. When I returned, the plant was ready to harvest!
This particular plant had a few rough patches but she came through rather well.
There was a little overfertilizing during flower because of a badly measured dose. This caused the tips of the leaves to burn and turn grey. We had to flush the plant for a week to remove excess nutrients. You can learn how easy it to fix overfertilized cannabis on this post.
At one point the plant needed to be moved to a friends house. Unfortunately, it was moved in the middle of a Canadian winter. The outside temperature was below 20 and the plant was stressed during the move. This caused many leaves to turn purple and never revert back to green. ?
Despite these fallbacks that would definitely lower the total possible yield, the plant kept chugging along. Cannabis is so resilient, that’s one thing I love about growing it.
The green crack seed started germinating on Dec 11th, 2018 and we harvested on April 7th, 2019. That’s 117 days or almost 4 months. This length of time isn’t bad for a photoperiod plant like this one. Green crack is known to have a flowering period between 6-9 weeks. This plant was in flower for 9.

Did you miss the post where we built the SpaceBucket? You can find it right here.

When to Harvest
Figuring out the right time to harvest can be a little tricky by eye. The best indicator of bud maturity is the colour of the trichomes. These stalks have a ball on top that will change from clear to cloudy, and then to amber. Clear trichomes mean the plant is immature and low potency. Cloudy means the bud has reached full potency. Once the trichomes turn amber, it means they are overripe and start losing potency.
When to harvest exactly is up to a growers taste and the speed the plant is maturing. In most cases, you’ll want to harvest when the majority of the plant has cloudy trichomes or when 80% of the hairs (pistils) have changed to a darker colour.

Flushing
Typically you want to flush a week or two before harvest when growing in soil. Sometimes it can be tricky figuring out exactly when this will be. As stated before you want the trichomes to be cloudy when you cut down the plant. You will need to make an educated guess on when to start flushing based on how fast the plant is maturing.
What flushing does is remove any excess nutrients and salts from the soil. This gives the plant time to metabolize nutrients while stopping it from absorbing any more.
If you flush too long the plant will start showing signs of nutrient deficiencies, and your buds will begin to yellow.
There’s a lot of debate about when to flush and for how long. Growers agree that flushing improves the smoothness of the smoke.

Clip & Trim
This plant was was very easy to harvest because of the low-stress training and pruning that was done during veg and flower. There were 9 main colas, there would have been 10, but I accidentally snapped a branch early on.
To harvest your buds, cut the stem a few inches from the bottom of the bud. At this point, you can choose to hang them to dry or give them a trim.
By using a small sharp pair of clippers you will remove anything that isn’t bud. You’ll want to wear some nitrile gloves or something because these fresh buds will make your hands really sticky. Remove as many leaves as possible. Leaves have little THC and are full of chlorophyll which is very harsh to smoke. You can save these clipping to make hash if you want.
When you trim your cannabis your final product will look beautiful and well manicured. Trimming is for the sake of vanity really, trimmed buds simply look impressive when stored in a stash jar.
If you plan on pressing your buds or turning them into an oil or some other infusion, trimming might not be necessary.


These pruning scissors are the best for trimming. Order yours here.
Hang to Dry
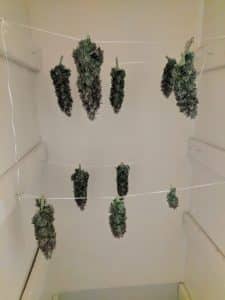 Once your trim is done, you must find a safe place to hang them to dry. With this small harvest, we used a closet and tied up a few lines of string.
We have a cannabis drying rack available through our store which can be quite handy for larger harvests.
Space your buds out evenly on the strings. Leave them for about a week until they have dried sufficiently. Slow and low is the key to drying cannabis properly.
Don’t try and rush the drying process by increasing the heat or using a dehumidifier. Doing so will greatly reduce the quality of your buds when it comes to flavor and harshness.
Terpenes are the essential oils that give cannabis buds their flavour profile. These terpenes are volatile and will evaporate or be damaged when the temperature gets higher than 25 degrees Celcius.
The drying process also gives the buds time to breakdown carbohydrates and chlorophyll. If the bud is dried too quickly, these compounds will remain and make for a harsher smoke.
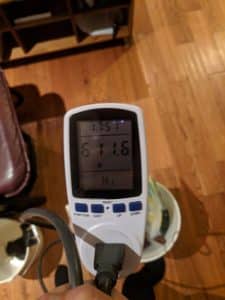
Your drying room should have a relative humidity of 50% and a temperature around 20 degrees Celcius. The drying area should also be completely dark to avoid light damage.
Buds have completed the drying process when the stems have become just brittle enough that they snap when you try to bend them.
These dry buds should then be kept in an airtight container like a mason jar to begin the curing process.
Thoughts on this grow
I really liked this spacebucket setup! It was easy to move around and transport. It seems like an easy way to grow one plant in a very small amount of space. This particular bucket didn’t have a lot of vertical space, so training the plant was necessary. If you wanted to increase the vertical height of the spacebucket you can simply use another bucket as a spacer.
The yield ended up being about 190g wet weight. Drying should reduce the weight by around 50% and I should be left with close to 3 and a half ounces. Not that bad considering the size of the plant.
Once I added the humidifier, carbon filter, and controller the total cost was around $400. It would cost almost the same as a small tent set up with the same capabilities. So I guess if you have the room a tent might be a better option. On the other hand, if you have little extra space and need to transport your plant, the bucket is an awesome solution.
It was a fun experiment and next time I’d like to try it with and autoflower plant.
Thanks again for following along with this grow, there will be more in the future so make sure you’re following Reefertilizer on social media. If you liked this article and found it helpful, please share it with anyone who might find it useful.
Cheers,
Mike Drouin
This is part 3 of a 3 part series about growing with a spacebucket.
Part 1 – Spacebucket Update – How to Build a Spacebucket
Part 2 – Spacebucket Update – Fan Adapter, Humidity, Temperature, and Smell Control
If you want to learn even more about growing good cannabis, we offer a free 40+ page guide full of images.
Now available on Amazon.
Sign up for our newsletter and download the digital copy today!
This guide will answer many questions about growing cannabis, like the following...
Selecting Seeds
Identify and Correct Problems
Maximize Yield
Much More...
Get a Chance to INSTANTLY WIN a Reefertilizer Nutrient Kit When You Sign Up.
Mike Drouin is the co-founder of Reefertilizer. He’s an experienced craft cannabis grower and a writer of many articles regarding the process. Mike lives on Vancouver Island and enjoys cycling and camping and will sometimes combine the two.
Comments are closed.